
In July 2018, Google announced all non-HTTPS sites as ‘Not Secure’. Since then the HTTPS protocol has become an official and quite mandatory web standard, for what concerns best practices and data safety. So, learning how to enable HTTPS for your WordPress site is an important issue. If you are about to launch your site, you should integrate HTTPS into it.
But if your WordPress site is already running on HTTP, you can move it to HTTPS quite easily. In today’s tutorial, you will help you to learn how to move your WordPress site from HTTP to HTTPS easily by adding an SSL certificate.
What is HTTP, HTTPS & SSL?
HTTP:
Hypertext Transfer Protocol is the full form of HTTP. HTTP is an application layer protocol designed to transfer information between networked devices and runs on top of other layers of the network protocol stack. A typical flow over HTTP involves a client machine requesting the server, which then sends a response message. The current HTTP version is HTTP/2.
SSL:
The name SSL stands for Secure Sockets Layer. SSL is an internet security protocol that uses encryption to protect traffic flowing between your browser and a web server. In the context of the web and WordPress, SSL security is provided by a certificate known as an SSL certificate. A website domain requires an SSL certificate to be able to use SSL. An SSL certificate enables any compatible browser to request an encrypted connection. This overcomes the main weakness of HTTP. That of sending all traffic in the clear.
HTTPS:
HTTPS stands for Hypertext Transport Protocol Secure. It is simply an encryption method that assures a secure connection between a user’s browser and the web server hosting your website. HTTPS is a combination of HTTP with SSL/TLS. This helps protect against hackers who may try to intercept information being shared. It means that HTTPS is an HTTP connection which is delivering the data secured using SSL/TLS.
Why should You Enable HTTPS for Your WordPress Site?
You might be wondering why you should enable HTTPS for your WordPress site. There are quite a few reasons why you should enable HTTPS for your WordPress site. Let’s take a quick look at each.
Security:
Every website owner has a responsibility to give their visitors a better user experience as well as protect them while they are with you. The biggest reason for HTTPS is the added security. By enabling HTTPS you can serve your website over an encrypted SSL connection. That means your data and information are no longer passed in plain text.
SEO Benefits:
Having an SSL certificate on your site gives you a slight ranking boost in terms of SEO. If websites don’t use HTTPS, they won’t rank as highly as those that do. If you’re spending money on SEO or SEO plugins and don’t use HTTP, you’re flushing money down the drain!
Trust:
HTTPS can help your business by building what we call SSL trust. Many customers will refuse to do business with a website that doesn’t have an SSL certificate. By seeing the SSL site seal, customers will instantly have more peace of mind knowing that their data is more secure. If your website is such that it demands sensitive personal details from users, HTTPS is a must.
Faster site speed:
Websites using HTTPS are significantly faster than those who are not using it. As visitors don’t like to wait for loading, your site speed is extremely important. There are numbers of factors that affect your site speed, including the theme and plugins you’re using, your web hosting and properly optimized images, among others.
How to Get an SSL Certificate?
The first thing to enable HTTPS is getting an SSL certificate. You can either get it for free or paid. The paid version is between $20 and $75 per year. Also, you might already have an SSL certificate as part of the hosting package for free.
The best WordPress hosting companies are offering free SSL certificates for all their users:
Unfortunately, we can’t give you exact instructions because the specific process will vary depending on your host. How easy or complicated this process is, depends largely on your host. We recommend you contact your host’s support or consult their knowledge base. Please ensure that you have an SSL certificate installed on your site before moving to the next section.
How to Enable HTTPS for WordPress Website:
After you have enabled SSL certificate in your host, you will need to set up WordPress to use SSL and HTTPS protocols on your website. You can do that with two methods. One is using a plugin (the easy way), another is manually (the hard way).
N.B: You should make a full backup of your website before starting the process. By doing so you can quickly and easily restore your website if anything goes wrong.
Method -1: Enable HTTPS Using a Plugin
If you’re a WordPress beginner or you don’t want to take the hassle of manually enable HTTPS for your WordPress site, using a plugin is the best option for you.
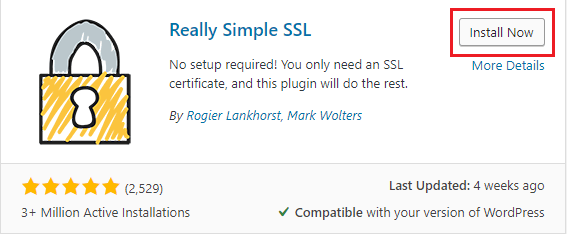
To get started, you need to install and activate the ‘Really Simple SSL’ plugin. Go to ‘Plugins > Add New’ in your WordPress dashboard’s sidebar and search for the plugin.
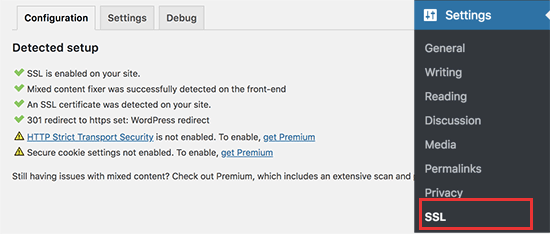
Once your installation and activation are done, go to ‘Settings’ and click on ‘SSL’. This plugin will detect the SSL certificate on your site, and it will set up your WordPress site to use HTTPS.
Here’s what the plugin does:
- Check your SSL certificate
- Configures WordPress to use HTTPS in all site URLs
- Sets up redirects from HTTP to HTTPS for your entire site
‘Really Simple SSL’ plugin says you can keep SSL and safely deactivate the plugin. But the truth is you should leave the plugin active at all times because deactivating the plugin can bring back mixed content errors.
N.B: ‘Really Simple SSL’ plugin tries to fix mixed content errors using output buffering technique, which can harm your site’s performance because it’s replacing content on the site as the page is being loaded. Generally, this should only affect the first-page load and should be minimized with a good caching plugin.
Method -2: Enable HTTPS Manually
This method should be attempted by skilled individuals or WordPress developers as it entails editing the WordPress theme and code files. This method takes a little longer but gives you full control over your website. Go to ‘Settings > General’ and replace HTTP with HTTPS in the ‘WordPress Address (URL)’ and ‘Site Address (URL)’ area. Don’t forget to click on the ‘Save changes’ button to save the changes.

Next, you need to set up WordPress redirects from HTTP to HTTPS by adding the following code to your .htaccess file. To do so open your .htaccess file in the root folder of your host and add the following code:
<IfModule mod_rewrite.c>
RewriteEngine On
RewriteCond %{HTTPS} off
RewriteRule ^(.*)$ https://%{HTTP_HOST}%{REQUEST_URI} [L,R=301]
</IfModule>
Now, save the code. By following these steps, you will avoid the WordPress HTTPS not working error because WordPress will now load your entire website using HTTPS.
Force SSL and HTTPS on Your WordPress Admin Area:
Now if you want to force SSL to your WordPress admin area, you will need access to your wp-config.php file. Just add the following code at the end of the wp-config.php file:
define(‘FORCE_SSL_ADMIN’, true);After adding the code, save the file. Your website is fully set up to use SSL now.
Re-submitting your HTTPS Site on Web Services:
Whatever method you have used to enable HTTPS for your WordPress site, you need to resubmit your HTTPS site on Web Services. Otherwise, Google will consider both HTTPS and HTTPS to be different websites.
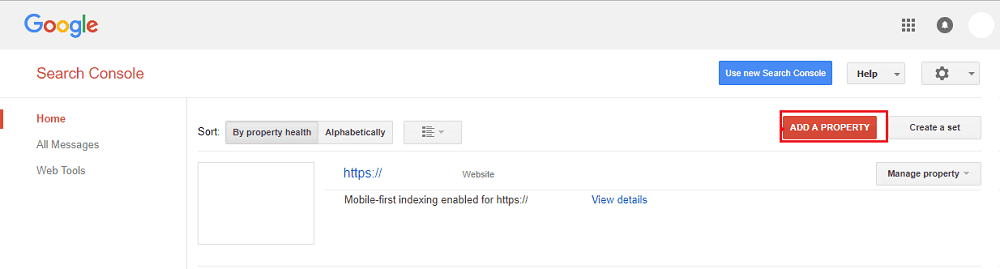
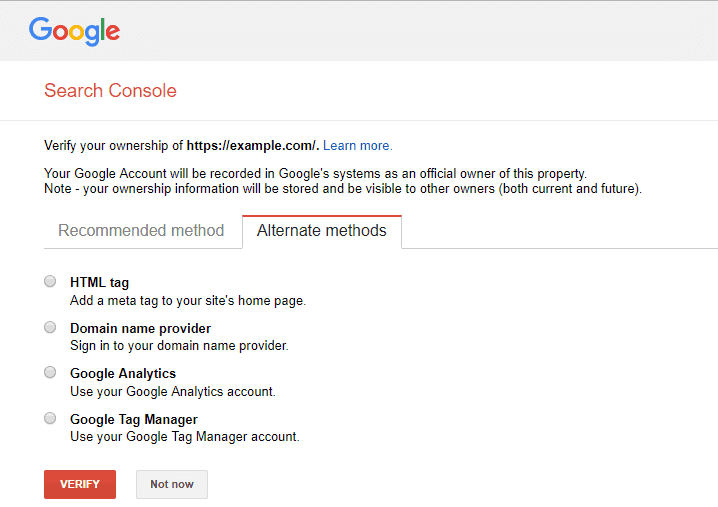
Google Search Console:
Go to your Google Search Console account and then click on the ‘Add a Property’ .
Now, you will see a popup, add your website’s HTTPS address.
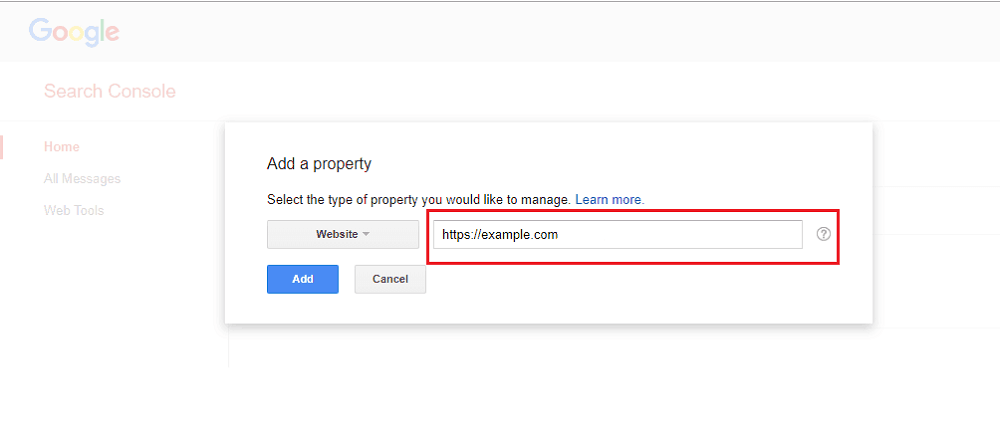
After that, Google will ask you to verify your website ownership. They provide several methods to do that, select any method to verify your site.
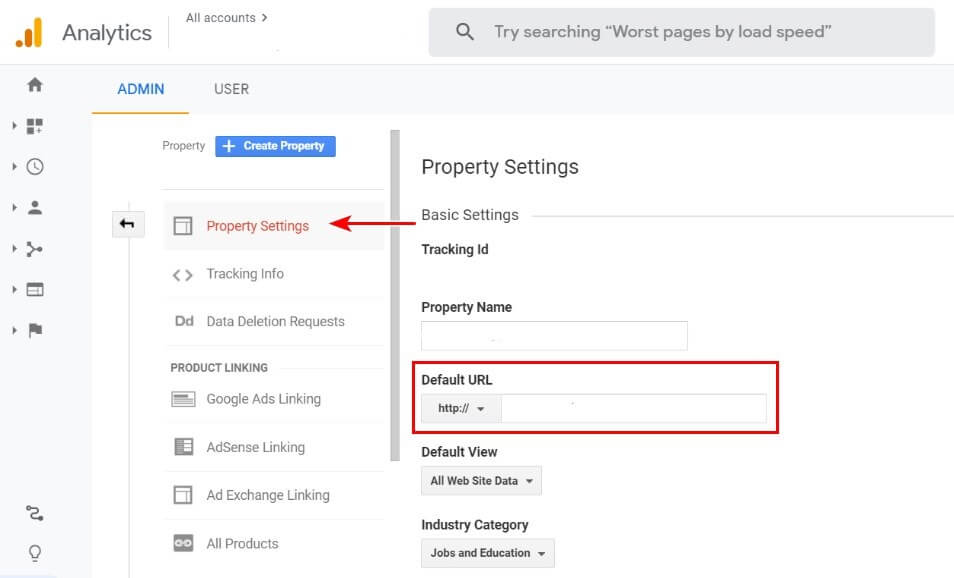
Google Analytics:
To resubmit your HTTPS site on Google Analytics, log into your Analytics account and then go to ‘Admin > Property Settings > Default URL’. Set the default URL in the center pane to reflect HTTPS and enter your URL.
Social Media Platforms:
You also need to update you URL of your website on all your social media profiles. Just log into each social media profile individually and edit your website from the main settings area.
As you see the process of enabling HTTPS for your WordPress site is quite straightforward. If you have further questions or comments, feel free to leave a comment below. We will try our best to help you out. Also, if you have any advice for enabling HTTPS for WordPress please share it with us. That will make things easier for others. Also, check our articles like Move WordPress To A New Host Without Taking Your Site Offline and Track User Activities in WordPress Using Google Analytics on our blog post page.

Pingback: Keep Your WordPress Site Secure from Hackers (15- Steps) - WordPress Download Manager